
process an opportunity to really become artistic, take some risks and bring a photo to life. Like in my Beautiful Mistakes blog, you can take a trash photo and find some beauty with creative editing.
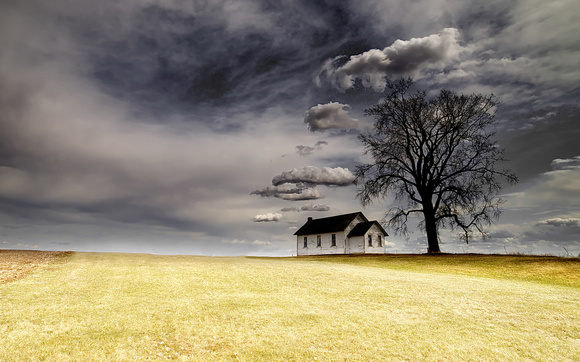
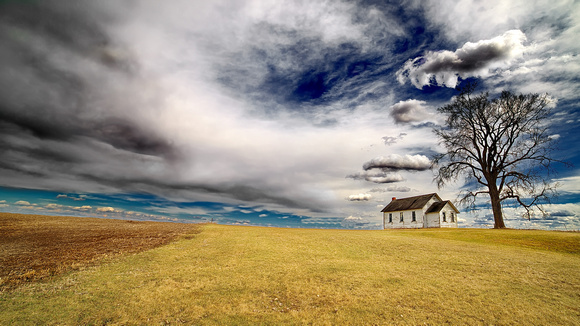
This is my original photo of an abandoned schoolhouse off Highway 63 just south of Zumbrota Falls in Southern Minnesota, USA. I stopped by earlier this week at two different times--morning with back lit sun and clear skies and then afternoon with cloudy skies and the sun at my back. Both times netted different results and I was happy with both sets of photos. This is an afternoon shot. I like these kind of shots as the subject is isolated and gives an opportunity for a clean edit. The schoolhouse and tree together with the placement at the top of a hill with nothing in front gave me a great composition opportunity.
I chose my Rokinon 14mm lens which is almost a fish-eye lens. A great lens for big-sky shots, astro photography and sweeping landscapes. It does give off some distortion as a by-product of the line of sight (almost 90 degrees) but nothing that cannot be fixed in post processing as you will see. Settings for this shot--iso100, f/16 at 1/160sec.
For my first edit, I chose a 5x8 aspect ratio. I also edited it with a 16x9 ratio that works well for sweeping landscapes but this photo may end up being
 my submission for the upcoming Minnesota State Fair Photography Contest and for that I would want to go with a ratio that is a little more compact. 5x8 is closest to the standard full frame sensor size so pretty normal crop. First task was to fix lens distortion which was a quick edit in my software (AcdSee Pro). Enhancements to light were to highlight the foreground, adding a little shadowing to pull eyes toward the house and tree subject. I wanted to keep the steel-blue in the sky so I enhanced the blue and then darkened it. Next I did some spot lightening of the clouds in the foreground around the perimeter to give it a little 3-d look along with some selective sharpening. Finally I cleaned up the horizon line removing the bushes to the left of the house for a clean look. I think this photo captured the look I was after. Clean, simple with the story being the little abandoned schoolhouse in the middle of America and the stories it could tell.
For the next edit I decided to take a little risk with contrast. I chose to lighten the foreground and darken/desaturate the background giving a
different look to the photo--more of a front-lit look. I lightened the house a little and darkened the tree. Just a different take on the same photo. I
liked this version's contrast offered and it gives off a different mood. In comparing the two I honestly do not have a preference and as the State Fair contest approaches, I will have to decide which edit will catch the eye of the judge. Some other enhancements made in both these were to sharpen the house and foreground clouds and remove the noise in the clouds which softens the background clouds a little and gives the 3-D separation between the foreground and background clouds.
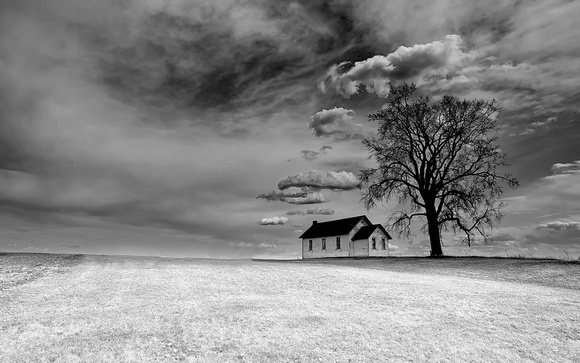
My next edit is first Black and White--this photo screams to be black and white and for this photo I converted the second photo. When I convert a photo I choose to de-saturate each color independent of each other rather than using the 'convert to black and white' tool in the editing software. I apply lighting changes to each color independently as I desaturate as to maintain tonal control rather than depending on the software to make the changes for me. a little tonal changes once converted--lightening up the foreground but keeping the same feel of the photo it was converted from.
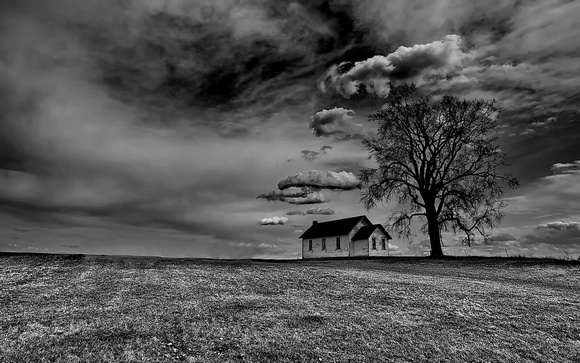
Next I decided to try a little low-key. Basically an under-exposed photo or in layman's terms, darkening the photo. This gives me a little more moody, dismal, bad weather look. If I were to make any changes in this edit it may be to lighten the house just a little bit. I have some photography friends that produce amazing results with low-key black and white--I am still trying to find my groove but this edit gets me closer to finding the right look.
 Maybe my favorite photography is minimalist so it is natural that I would try a minimalist conversion for this photograph. This is the edit that took me the longest to achieve. To get the look I basically have to selectively bleach the photograph, losing all elements other than what I want to highlight. I don't count but this is about a 10 step process I do with agressive lightening that cannot be done with one step. I also will mask elements along the way and use a combination of erasing and desaturating isolated elements to get the desired look. For this photo I actually combined the foreground of my second edit with the background of my first black and white edit. I added some shadowing to the foreground and played with the roof a little to bring some texture to it. Minimalist photography is a different art form but one that I continue to fall in love with.
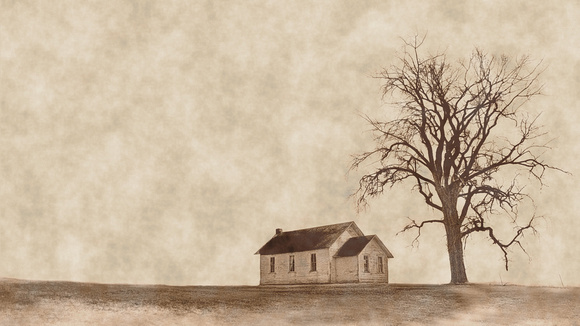
For my final edit I decided to use the "old school" preset that is included with the software--AcdSee comes with about 40 special effect presets that I seldom use but I wanted to do a sepia rendition of this photo and for that I need to go to their special effects. When I saw the preset for Old School, I decided to give it a go. I imagine a photographer could have taken this same photo 130 years ago when the schoolhouse was built--of course the tree would have been just a sapling.
Not every photograph ends up with six different edits--but many times I will try different edits and compare the two before deciding what to enter in a contest or upload. I find it fascinating how an edit can totally change the feel, emotion and mood of a photograph. Thank you for visiting my blog and feel free to contact me at any time with questions or comments.
UPDATE APRIL 16, 2019. I have received great feedback on this blog. A couple of suggestions is that the tree distracts from the schoolhouse. I also wanted to get a "Big Sky" look so I took on two new edits. The first was to crop to gain maximum sky and to put the subjects as far right as possible--This is partially for a photo contest on "Open Spaces" so this the first edit fits the theme. Second edit is off that same photo and removing the tree--quite a daunting task that required me to rebuild the cloud structure behind the tree and make it look all natural. No edit is perfect and this one certainly is not but I gave myself an hour to get it done and it is pretty close to my vision--here are the updated edits;
 16x9 aspect ratio with enhancements to the sky as the primary edit.
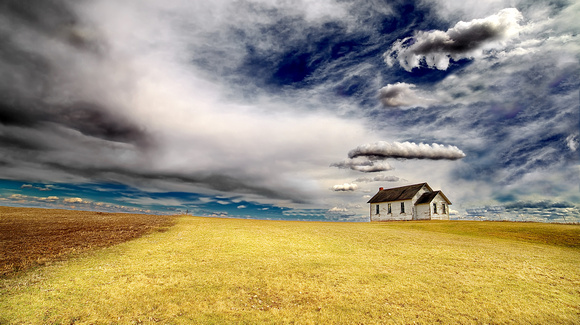
16x9 aspect ratio. Remove tree and rebuild cloud structure behind tree. Same photo as above but a little higher contrast in the field in front of the schoolhouse.
]]> I will be the first to admit I am a lens junkie. In my world a guy can never have enough lenses and I never met a lens I did not like. And as for cameras--I am a Canon guy--have been since early in my photography career. I will admit though my second favorite camera is my Iphone 8plus and under the right circumstances it is a great camera especially the panorama feature which cannot be beat. I also have an old Pentax K-1000 that I got when I was around 20 years old--I still have a romantic connection to film and I run a roll or two of black and white through it every year or so just for old time sake.

I wanted to do a blog on my gear with focus on my lens choices. My mix of lenses is a never-ending journey but at this stage of my career I seem to have found a lens for every situation and am happy with what is in my bag (well, today I am happy but that will change....). I am always on the hunt for great lens value and hope to someday upgrade most of my glass to the best money can buy. Yet I have found for a photographer on a budget you can do pretty well with glass choices that I consider pretty reasonable. Although I am a Canon Guy and love their lenses, I have a mix of manufacturers in my bag, mostly for the economy of the lens and great reputation. I certainly do not think I have the best of the best all the way through my collection but for what I shoot I am very happy with what I got--at least until tomorrow. So without further ado I will showcase my lens collection with some examples of what I have shot with them. Ordered from shortest distance to longest;
Rokinon 14mm f2.8
One of my newer additions as I wanted something to give me big sky, wide angle. I reviewed a lot of lenses in the "less than 15mm" area and decided on this for two reasons. First, the price---for around $300.00 I thought it a deal and knowing it would be used on special occasions and sparingly, I could stomach the cost. This is a fixed prime lens and the only lens in my bag without auto-focus. But for what I will shoot with it (big

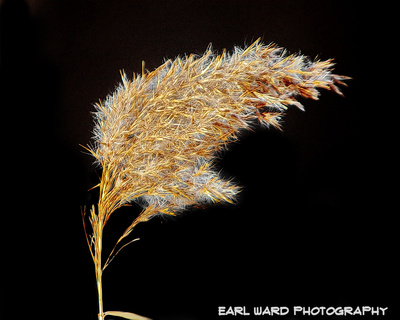
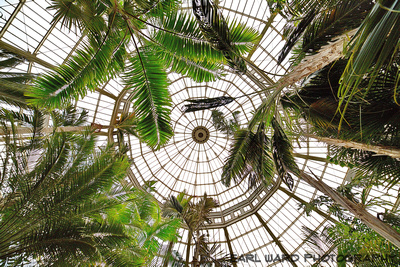 sky, night photography, star photography and wide-angle architecture) I will have the focus set on infinity so auto focus is not that important. I have only used it on a few shoots and took it for a test run to Como Conservatory in Saint Paul with the results shown here. I look forward to a summer trip to the North Shore of Lake Superior for some star photography which is primarily why I got it. Sporty, fun and inexpensive low mm lens.
Tamron 28-300 f3.5-6.3 Di, VC, PZD
I have an affection for Tamron lenses and have owned quite a few of them. I still have a Canon T6i crop sensor that has permanently attached a Tamron 18-400 lens. I must have shot 50,000 photos with that combination as the versatility cannot be beat. When I moved up to my full frame 6D
 Mark II I looked for something that would give me the range of the Tamron 18-400 for a walk-around set up. Unfortunately, Tamron only makes that lens for crop sensor (Please Tamron,
 come out with a full frame version--you will have a buyer in me). With limited choices I settled on the 28-300 and have been very happy with the lens. Although there may be better glass out there (Canon L, Prime lenses etc), for full frame there is nothing more versatile and economical. I think I paid about $600.00 for it and money well spent. Last fall I went on a trip to New York City specifically to do some urban exploring from subways to the Top of the World Trade Center. Not wanting to carry gear around all day I attached the Tamron 28-300 to my Canon and spent 4 rainy days exploring the greatest city on earth. This lens makes me happy and it does not let me down--it is one of my favorites and my "go to" walk around all purpose lens and a great
investment.
Sigma 105 f2.8 Macro
 About a year ago I decided I wanted a high-quality Macro Lens in my bag. I had a Canon 60mm Macro for my crop sensor and it did not get used that much. but then again, it was a limiting lens and hard to work with. I read all the reviews on macros around the 100mm range--Canon,
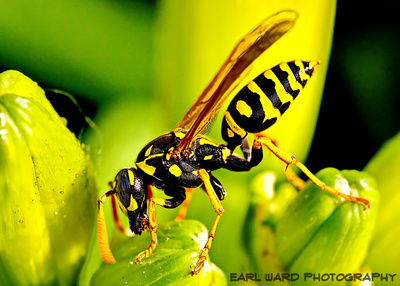
Tamron and Sigma were my choices. I decided on the Sigma based solely on the reviews which all seemed to point to the Sigma as the best overall lens--quality on par or better than the Canon L lens and at around $600.00 a few hundred less than the Canon. I am very happy with this investment and have spent the last year learning a lot about macro. It is not easy and takes a lot of practice to get it right but once you take a great macro photo you are hooked. Highly recommend the Sigma 105 Macro as I love the results I get.
Canon EF 24-105 f3.5-5.6
This is one of two lenses
 that came with my Canon 6D Mark II and the standard "Kit" style lens that Canon supplies with their package. Although this is not an "F" lens, it gives me great results and
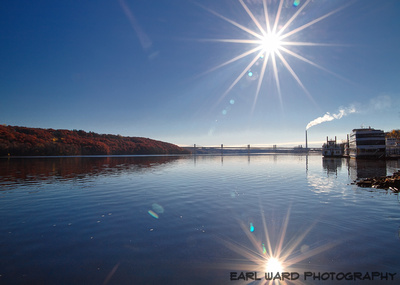
 from what I have read the elements of the F lens and the EF are pretty much the same--the body construction of the F is the big difference. So for me it is a great Canon lens. This is my 'go to' lens for night landscape/cityscape photography and I absolutely love the bokeh it delivers and especially the star flares you get with night and day photography. I do a lot of night cityscape and had the opportunity to shoot the memorial beams at the World Trade

Center Ground Zero site on September 11, 2018--a spiritual experience with a great lens I got great results. Two examples show the star flares it gives you which are exceptional. I do use this lens as a walk-around also especially if I am out and about at night. I can see the "L" version of this lens in my future.
Canon 70-200 f2.8L
One of my newest lenses in the bag. I often find myself searching the on-line classifieds for lens deals. Most people that advertise l
ense
s know what they have and as lenses hold their value, deals are few and far between. But one day last summer I saw an advertisement for this iconic Canon lens. It was advertised for $500.00 and included a Canon 2X teleconverter! I could not pass it up and jumped on it right away having seen similar lens-only for around $800-1500 used this was just too good to pass up. This is a beefy lens, built like a tank and about as heavy and mine shows wear and tear from years of use by the professional photographer father from who I bought it from (he had passed away recently and the son needed the money so the story goes). It is a lens that kind of falls into an 'in between' area as I have all the focal lengths covered with my other zoom lenses thus I have not used it much. But it is my first L lens and I love the sharpness, speed, bokeh and detail it delivers. I hope to shoot more with it this summer and happy to have found this iconic gem at a great price for my collection.
Sigma 100-400 f5-6.3 DG Contemporary

There is only one reason this gem is in my bag--it came with the Canon 6D Mark II bundle I found--I could not pass up the value of the bundle and basically it was like they were throwing in the Sigma for free! I know a lot of photographers that have the Canon 100-400L in their bag and this is similar in quality and
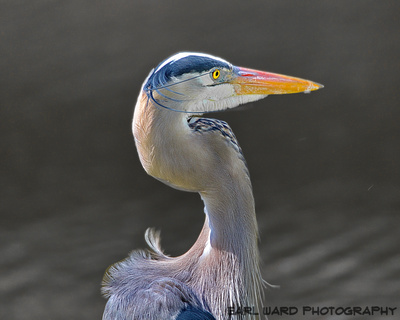
versatility. I use it as an alternative to my Tamron 150-600 as it actually
fits in my bag where the Tamron monster lens does not. Thus I will take it on the road with me and when birding this is a great lens as you can see by the examples. I take it on the golf course with me as there are always birds hanging around. the quality I have got is great, fast speed and sharp delivery. Happy to have it in my bag. And although it came as a kit, at around $700.00 retail, it is a great value especially for those on a budget that cannot afford the Canon version at triple the price.
Tamron 150-600 f5-6.3 G2
This is my favorite lens. I love everything about it. I use it mainly for wildlife and birding and have had it in my bag for about a year. Although big
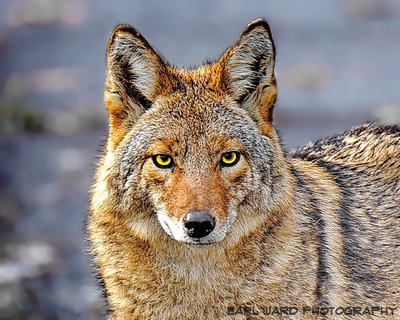 and bulky I find it very versatile and I have actually used it for some macro photography as you can get the depth of field that a macro lens does not offer. Amazingly fast focus and the image stabilizer is fantastic--you can actually see it lock on to the subject. Like all large lenses, you need good light to take advantage of it's speed but it cannot be beat for overall quality and value. Mike
 cost $1299.00 and came with a carrying case that is a must--you do not want this giant rattling around in your back seat. I also have the 2x teleconverter for this lens which effectively gives you 1200mm. Takes practice to use it and auto focus is not as effective as it "hunts" too much and you gotta have great light to get good results--but nothing better on the market for long reach situations. I love the results and have taken some award winning photographs with this beauty and it will be a part of my lens collection for years to come.

Well, that is my lens collection. I will be putting together a future blog on accessories, filters, bags and other stuff that I use and endorse. Thank you for reading and I look forward to any comments, suggestions or questions you have.
]]>
]]>

This is the original photo taken October 3rd, 2017 at 7:26 am. I had a home on a lake at the time and in early morning light I saw an egret sitting on my dock. I grabbed my camera and headed out to get a close up only to startle the bird and watched him fly away disappointed. I headed out to my dock in case he landed nearby and was just enjoying the morning although there was a light rain, almost a mist in the air--conditions were dark and not at all ideal for photography. Yet it was a good moment to be outside and I found myself enjoying the peace and quiet of the early morning.
Now the photo--As I was panning the lake looking for the egret I heard a commotion across the lake that could only be a large bird attempting flight. I lifted my camera just in time to see one of the many Canadian Geese that frequented our lake taking off across the bay--about 250 yards out. I instinctively put my camera to my eye and let the shutter fly capturing about 10 shots in the course of the next few seconds. My settings were not right for the light or the speed needed to capture the bird attempting to take off--iso800, f5.6, 1/60sec shutter speed and 250mm lens setting, Canon Rebel xsi. When downloading the photos I was disappointed with the results--but I knew I would be. Normally I would just hit the delete button and chalk the morning of to experience but something in one of the photo bursts caught my eye. Thus I decided to not delete the batch and made a file and basically forgot about the photos.
About a year later I found myself immersed in competitive photography on a site called GuruShots. There was an upcoming contest called "Beautiful failures". GuruShots has about 2 million photographers from throughout the world that compete in a platform where the contestants vote on each other in a blind format. Some of the best photographers in the world are on display and the competition is intense. Challenges are ran by those photographers that achieve the highest level (Guru) and earn the right to set their own theme. Challenges have anywhere from 5000 to over 100,000 participants all vying to win, make top 10 or top 100--as you can imagine it is extremely competitive with only the best photos rising to the top of the ranks. I very much enjoy the site and have achieved Guru Status, have 7 wins and have hosted about a dozen challenges myself. Combining my competitive nature with the ability to showcase my photography against some of the best photographers in the world and to compete at the highest level is great fun and through GuruShots I have come to know and call friends photographers from all over the world. I will write a future blog on competitive photography but back to my favorite mistake.
The Beautiful Failure challenge description was just that--photo failures that in their own way were art. My goose taking off photo came to mind and I set out to find it in my archives--which was a challenge in itself as back then I did not use keywords or any discernible method for looking up my photos--just the date taken. Once found I began editing with my editing platform of choice--ACDSee Pro (I am a big fan as unlike the new version of PhotoShop, you buy the software, not rent and your photo filing stays on your computer, not on their cloud site). Here is my first edit which I entered;
 Editing was not all that extensive with the biggest and first edit removing the sign in the background, then applying light edits and some color enhancements and finally sharpening the goose and splashing. The unique aspect of this photo is it's almost double exposure quality that was a result of my camera moving while taking the shot. The grain for the most part was kept and the streaks of the rain coming down gives this a kind of a painting look that some have said reminds them of a "Monet" painting--cannot say I disagree. The photo made top 100 out of approximately 10,000 entries (as I recall) and I was happy with the competitive results. I have since done some further edits and below is an edit where I 'bleached' the photo to give it a minimalism quality.

So I guess the morale of the story is to think twice before you delete and even a photo failure can turn into a unique and beautiful work of art. One final edit of the same photo below. Thanks for reading and I will enjoy any comments or feedback you have to offer.
